" "

Applications

Integrating Your Personal Kanban with Campfire in LeanKit using Zapier

Does your team use Campfire? Ever wish you could just create a LeanKit card from the Campfire chat window, just by typing in a simple command?   This integration between Campfire and LeanKit, via Zapier.com, will let you do just that.

Create a New Zap using Campfire and LeanKit

Add your Campfire API token

Configuring the Campfire Trigger

Filter Campfire Trigger

Typing the Message in Campfire

Setting Up the LeanKit Side of Integration

Title, Description and Other Required LeanKit Fields

Testing the Integration

Running Your Zap Manually from the Dashboard

LeanKit Card on Your Personal Kanban Board

In your Zapier account, create a new Zap, using the Campfire “New Message” trigger and the LeanKit “New-Add Card” action.Zapier will prompt you to set up your Campfire account, and ask for your Campfire API token:Once you have your Campfire and LeanKit accounts set up correctly...…you’ll be able to configure your campfire trigger. I chose to set it so that if I type cflk  (for “CampFire LeanKit) at the beginning of a message in Campfire, that will be the signal to create a LeanKit card from that message.Now I’ll go into my campfire room and type a message:And then set up the LeanKit side of my integration to point to my personal kanban board, target lane, and card type:I’ll set the Title, Description, and other required LeanKit fields:And then test the integration:I did have a little trouble at this step. If you’re using an existing campfire room and one of the first 3 messages doesn’t match your filter, Zapier isn’t pulling up a trigger sample that matches the filter for you to test with. In that case, I saved my Zap anyway, and then ran it manually from the Dashboard:And Viola! I have a LeanKit card reminding me to buy bacon. As if I would ever forget something that important. :)This is the fourth post in the series by Chris Hefley of LeanKit showing how to integrate tools many of us use everyday with our Personal Kanban. You can read the previous post – Personal Kanban: Integrating Evernote with LeanKit using Zapier here.

Personal Kanban: Integrating Evernote with LeanKit using Zapier

Continuing our series of Personal Kanban focused integrations for LeanKit, let’s take a look at integrating Evernote with LeanKit. Say you’re in Evernote, and you want to quickly add a card to your personal kanban board in LeanKit.  With this integration, you can simply add “(LK)” to the note title, and BAM! LeanKit card.

Creating a new Zap trigger from Evernote

Authorizing Your Evernote Account

Set up LeanKit Evernote Accounts

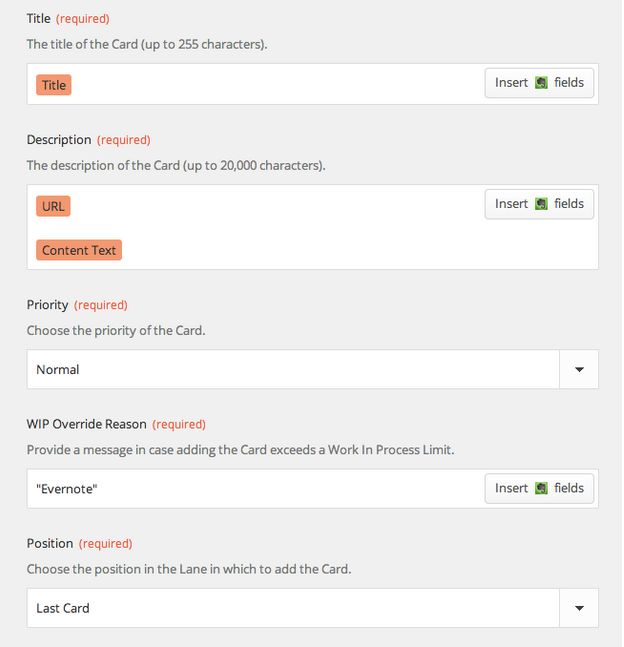
Configuring LeanKit Fields Evernote Title and LeanKit Card Title

Adding Evernote URL field to LeanKit description field

Creating a New Note in Evernote

Test and Naming the Zap

New LeanKit card

URL to the original note included in leanKit card

As in our other integrations, we’re going to use Zapier.com to connect Evernote and LeanKit.Create a new “Zap” using the “New Note” trigger from Evernote with the “New -Add Card” action from LeanKit.Zapier will prompt you to authorize your Evernote account:After setting up your LeanKit and Evernote accounts,You can now configure the trigger for evernote. I chose to add a filter on the note title. In any notebook, I can add “(LK)” to the note title and have a LeanKit card created for that note. I could have chosen other options here, and you may decide you’d like it to work differently. For exaple, you could create a separate notebook in Evernote, and just have all notes from that notebook get added to LeanKit as cards. Or you could use the “tags” in evernote instead of the title, like I did.Now configure the LeanKit fields, including the Evernote Title in the LeanKit Card Title field.I also added the Evernote “URL” field to the LeanKit Description field, to provide me with a link back to the original note.So, to test this, create a new note in Evernote, with “(LK)” in the note Title:Then test and name the Zap you’ve created:And you should get a new LeanKit card, as shown below:You can also see the URL to the original note included in the description of the LeanKit card:Enjoy!This is the third post in the series by Chris Hefley of LeanKit showing how to integrate tools many of us use everyday with our Personal Kanban. You can read the previous post - Personal Kanban using Google Calendar, LeanKit and Zapier here

Personal Kanban using Google Calendar, LeanKit and Zapier

This is the second post in the series by Chris Hefley of LeanKit showing how to integrate tools many of us use everyday with our Personal Kanban. You can read the first post - Killing Email Interruptions: Personal Kanban using LeanKit, Gmail and Zapier here.

This time, we’ll look at how to integrate Google Calendar with LeanKit via Zapier.com. We’ll look at two different ways to use Google Calendar and LeanKit together.

Creating a Zap Trigger

Setting up GCal with LeanKit

Search Term for GCal Trigger

Creating a new card type in LeanKit

Matching GCal event to LeanKit

Adding Summary and Event Fields to LeanKIt Description Field

Creating an Event with LeanKit in the Event Title

Testing Zap

New LeanKit card on Personal Kanban board

Alternative way to add event cards to your board - Event Start Trigger

Setting up new trigger parameters

New Calendar Event Setup

Testing and naming the new Zap

New Event Card on the LeanKit board

First, let’s create a “Zap” based on the Google Calendar “New Event Search” trigger. This will allow to create a Google Calendar event and a corresponding LeanKit card at the same time.Zapier will prompt you to set up your Google Calendar account and you can use your already set-up LeanKit account.After setting up the accounts, set the Search Term for the Google Calendar trigger. I used “(LK)”. If I create an event with “(LK)” in the title, this integration will create a LeanKit card for that event. That way, I can easily control which events from my calendar get a card.Now, I want to create a new card type on my LeanKit board, for “Event”.Now that we’ve taken care of that, we can set up the target LeanKit board, lane, and card type.Use the “Summary” field from the list of fields available from Google Calendar for the LeanKit Card Title field.Not all my calendar appointments actually have a description. Since Description is a required field in the LeanKit integration, add the “Summary” and “Event Begins (Pretty)” fields to the LeanKit Description field, in addition to the Google Calendar Description field, as shown below:We’re nearly ready to test the integration. First, though, let’s go to Google Calendar and create an event with “(LK)” in the event title:Finally, test and name the Zap:And you should get a new LeanKit “Event” card on your personal kanban board:There’s one other way I’d like to integrate my Google Calendar with LeanKit. I’d like to create a new card on my LeanKit board one day before a scheduled event, instead of immediately when I first create the event. So, if I’m using my personal kanban board to keep track of things I have to do on a given day, I will get the next day’s events added the the board each day.For this integration, I’m going to use the “Event Start” trigger from Google Calendar.When setting up the trigger parameters, I chose 1 day, and used the Search Term “(LKF)” (for “LeanKit Future”). The Search Term is optional, if you want this trigger to fire for all events.For the LeanKit parameters, set them up the same as in the previous example, then create a new Google Calendar event. The event needs to be in the future, within 24 hours of the current time in order for our test to work. And I’ve added “(LKF”) to the event title:Test and name this Zap:...and we should now have a new Event card on our LeanKit board:There you go! Now you can create a card and event at the same time, or mark a calendar event to have a LeanKit card created in the future, when the event is 1 day away.

Kanban Seder

Seder Kanban

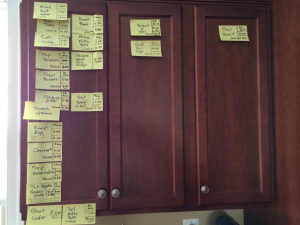
Last week my wife and I hosted a Passover Seder. We have entertained together a number of times, but this was the first real attempt at a coordinated, sit-down meal. Most of our gatherings have been buffets, and less dependent on timing.We knew getting the timing of the Seder right would be a challenge. The meal is served in the middle of the Seder, not just when the guests arrive. We also knew there would be a lot of uncertainty. Potatoes don’t always cook the way you want them to, and guests never arrive all together. It would be difficult to plan everything perfectly. However, we knew we would both feel a lot more comfortable if there was a plan, to help keep us on the same page when we started making adjustments… and we always have to make adjustments.The night before the Seder, we went through all the things we’d have to do. We’d used Kanban-style visualization techniques before (to pack for trips and track jobs around the house), and there are three cabinets in our kitchen that work great as Ready, Doing, and Done lanes. So at first I started listing out each major task on a sticky note, but I quickly felt this would be inadequate.Time was an essential component of everything we had to do. We couldn’t just pull tasks when we were ready. The brisket had to cook for hours; potatoes had to be peeled and seasoned before going in the oven; matzo balls had to chill before going in the water to boil; and different things had to be ready at different times, paced to the rhythm of the Seder. Coordinating the timing of each task was one of the main reasons for our planning exercise.The solution we used was to write the time required for each task on the upper right of the sticky note. This allowed us to get a good picture of the overall flow. Working backward from the end, we started to determine when we wanted each task to complete. We also recorded that information on the sticky notes. Finally, through a little quick subtraction, we determined the times we needed each task to start, and put that on the sticky notes. We tried to keep our number of concurrent tasks low—thus limiting our work in progress—by staggering tasks where we could. Once this was done, we had a plan. We went to bed, comfortable and confident.The next morning, things started to go awry. The Seder’s co-host, who was expected to arrive early to help with the preparations, had a family emergency and couldn’t come. This was a significant problem. The plan had assumed she would be there. She was also bringing the Haggadah, so my wife started looking for alternatives online, a task we hadn’t anticipated, and one that took a long time to complete.The brisket pan turned out to be too large for the meat and its sauce. At some point, all the sauce cooked down and started to burn. We caught it in time, but reworking the brisket dish in the middle of the other preparations was an emergency we hadn’t counted on.But our visualizations were resilient. We were able to absorb these unforeseen issues into our plan without disrupting our overall flow. One reason for this was the slack we’d built in the night before. We had arranged the plan to keep the number of concurrent tasks low. This helped. The act of planning had also allowed us to see what needed to happen at specific times and what could be flexed. To make up for the time and hands we’d lost, we started pulling flexible tasks ahead when we had a little slack. Having the start time on each task made it easy to identify what to do next; when either one of us came free, we could grab it and get started. The visualization also allowed us to talk about what we were doing and where we were with it. We didn’t have to waste time talking about what to do next and could quickly help each other when necessary. The Kanban was our shared view of our work, an effective distributed form of cognition.The final result was a fun Seder, an excellent meal, and nearly perfect timing, in spite of the inevitable hiccups. Our Kanban Seder was wonderful, and I’m looking forward to doing it again next year.Follow me on Twitter.

Killing Email Interruptions: Personal Kanban using LeanKit, Gmail, and Zapier

Quick intro from Jim Benson:

We've asked Chris Hefley from Leankit to write a series of posts showing how to integrate tools many of us use everyday with our Personal Kanban. These are fairly technical posts, but also very powerful ones.

In this first post, Chris mentions that his aim is to keep his inbox at zero by taking action items and moving them directly to his Personal Kanban. Tonianne and I have also noticed that we also tend to act on emails the moment they arrive. This means that we allow email to interrupt our flow of work - then we get to the end of the day and are disappointed by how we let those interruptions derail our day.

Chris lays out a simple mechanism to move emails into your Leankit Personal Kanban that can both clean out your inbox and give some of those interruptions their proper priority. Also, I've turned Chris' post into a video which is at the bottom.

Take it away, Chris

-----------

I aspire to keep my inbox at zero. About once every couple of weeks, I actually get there. I’ve got several tools that I use to help me with that, including moving emails to my Personal Kanban board in LeanKit.

LeanKit has a connector available for Zapier, a cloud based integration hub. Zapier provides hundreds more connectors with other applications, which makes it very easy to connect LeanKit with Gmail, ZenDesk, BugZilla, BaseCamp, and many more.In this article, I’ll show you how to set up a “Zap” to create a LeanKit card based on an email in Gmail, complete with a link back to the original email, so that you can get that “to do” item onto your Kanban board and out of your inbox.First, you’ll need to go to Zapier.com and create an account. There’s a free account that should work just fine, and if you need more integrations or faster synchronization you can upgrade later.Once you’ve created your account, you’ll be asked to create your first “Zap”, and presented with the screen below:

Integrating Zapier with LeanKit

On the Trigger (left) side, choose Gmail, and choose “New Thread”.

Choosing Gmail and a New Thread

On the Action side (right side) choose LeanKit and “New-Add Card” for the action.So that when a new Thread is created in Gmail that fits the criteria we will add later, it will create a matching card in LeanKit.

Adding LeanKit

Follow the steps in Zapier to set up your Gmail account:

Selecting an Email Account

…and your LeanKit account.

Conecting LeanKit to Zapier

Now, in a separate browser tab, go into your gmail account, open an email, and create a Label called “lk” (or something similar) for that email. (Help for how to create a label in Gmail: https://support.google.com/mail/answer/118708?hl=en)

Back in Zapier, in the filter for your Gmail Trigger, choose the “lk” label you created in the previous step (it could take a few minutes for the label to show up after you’ve created it. If you don’t see it after a few minutes, try saving your “Zap” incomplete, and then coming back to this step.)

Choosing Triggers

In Zapier, Choose the LeanKit board you’d like to add cards to. This will allow you to select from any board in your LeanKit account (that you have access to with your login).

Choosing a LeanKit Board

After selecting the Board, you’ll be able to select the lane you want new cards added to, and the Card Type you want for your new cards.

Selecting the LeanKit Lane

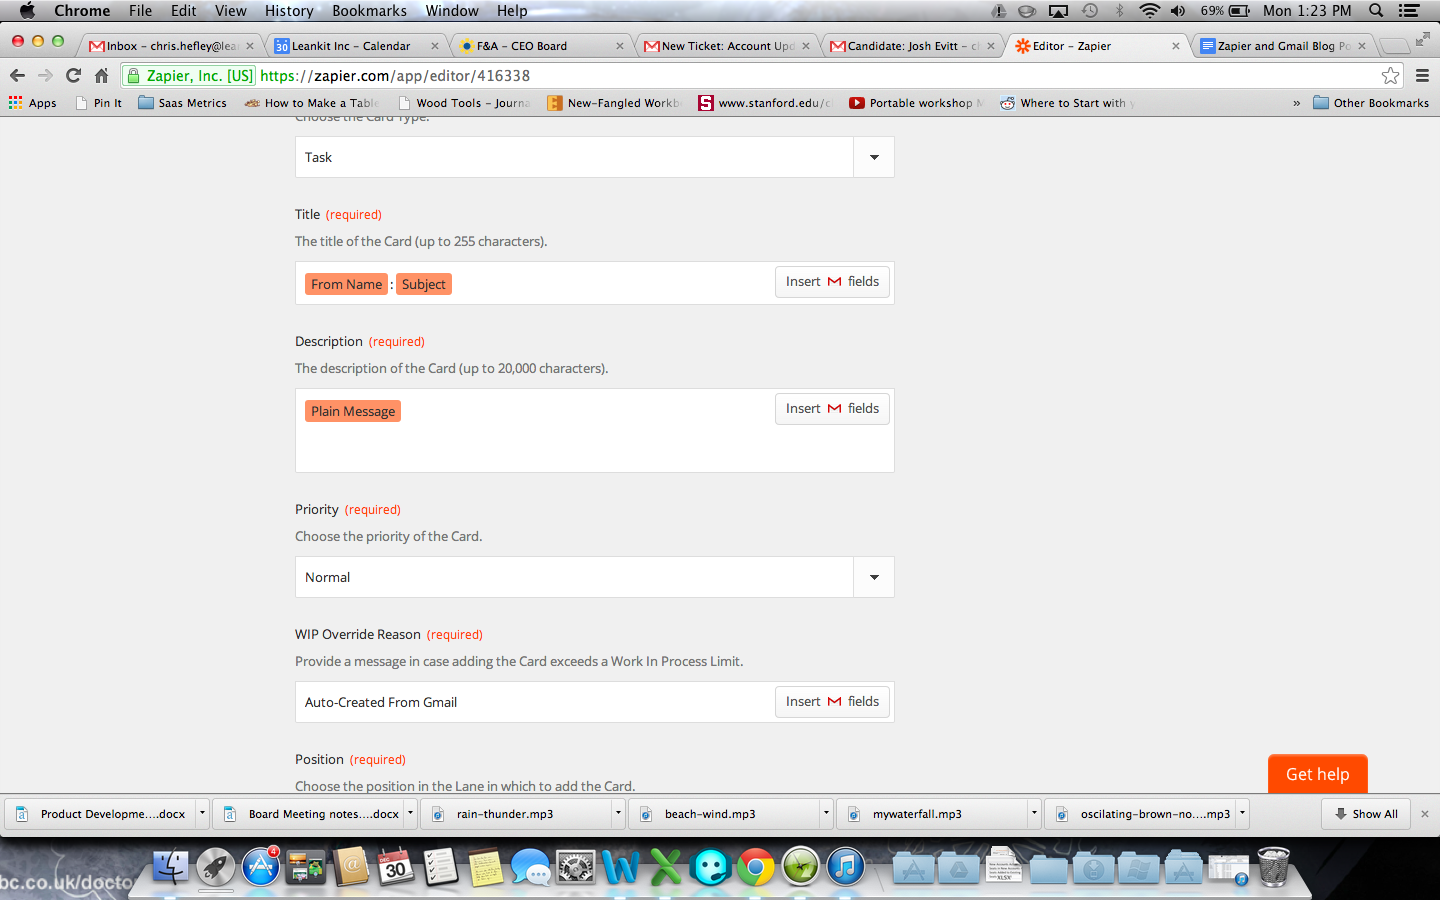
For the Card Title field, add the Gmail fields  “From Name” and “Subject”, and add “Plain Message” to the description field.

You can also add “ThreadURL” to the Description field if you’re using Basic or Team edition to provide a link back to the email. Or follow the instructions further down to add the link to the card header if you’re using Portfolio edition.

Selecting Card Fields

Test it like so:

Test Your Setup

Testing Your Setup 2

If you’re using LeanKit Portfolio Edition, you can use the “External Card ID” field. Add “ThreadID” to this field from the list of available Gmail fields.

Using the External Card ID Field

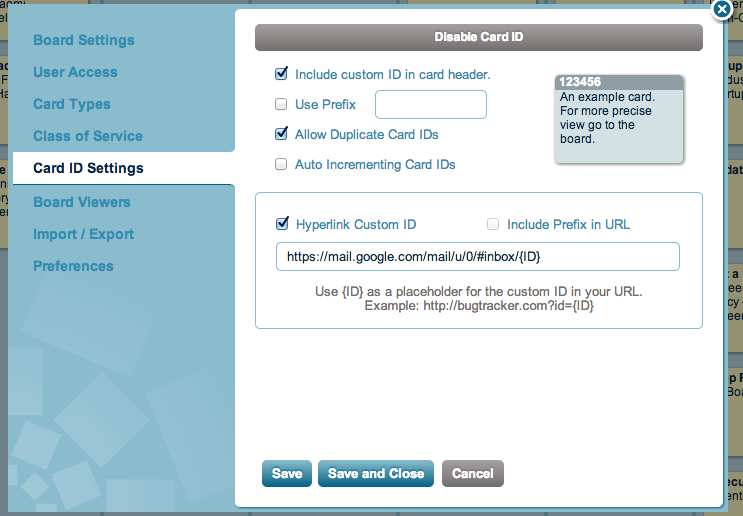
Open your LeanKit board in a new browser tab, and in the settings for your leankit board, enable Card ID, and set it up as shown below. The field is where the Gmail ThreadID will go.  (Check the gmail message url by opening an email in your browser and confirming the format of the url shown below for the email).

Enabling LeanKit Card ID

Now, the link to the original thread will appear in the header of the card, allowing you to quickly jump back there without opening the card to view the description.

Links on the LeanKit Task Cards

That should do it. You can test the Zap and turn it on in Zapier. Now, all you have to do is label a message in Gmail with “lk” and then archive it to get it out of your inbox. The next time the Zapier sync process runs, it will pick up that email and create a LeanKit card for it.

" "